This is a guide meant for novice, beginners and non-programmers who would like to use the Android SDK to do some basic things on Microsoft Windows computers. (Since you are not going to be developing applications on Android, you don't need to install ADT Plugin for Eclipse.)
If you still do not understand how to do it after you have read the materials below, you best option would be to look at some video tutorial which can be found on Youtube made by different users. Or you may try our support forum.
To use the Android emulator or the tools inside the SDK on an Android device, you need to do the following:
Step 1: Download the Android SDK
Download the latest SDK manager from the Android developer site.
Step 2: Install/Extract the SDK package
If you downloaded a .zip package (instead of the SDK installer), unpack it to a preferred location on your machine. By default, the SDK files are unpacked into a directory named android-sdk-<machine-platform>. You will need to have Java Runtime Environment installed, otherwise the SDK will not work. For those running 64 bit windows, make sure you have installed the 32 bit version of the Java Runtime Environment.
If you downloaded the Windows installer (.exe file), run it now and it will check whether the proper Java SE Development Kit (JDK) is installed (installing it, if necessary), then install the SDK Tools into a default location (which you can modify).
Step 3: Run the SDK manager and download components
Locate and open the folder where you have extracted the Android SDK and then double-click the SDK Manager.exe file. The SDK manager will attempt to connect to the internet and download the list of components you can download. When the list is downloaded, you will see the screen below.

Select the componenet you want to download and click install. To download the Android 3.0 SDK, select SDK Platform Android 3.0, select the accept button and click install. Note: If you use the "Accept All" option, it will download everything listed. You don't need to do that.
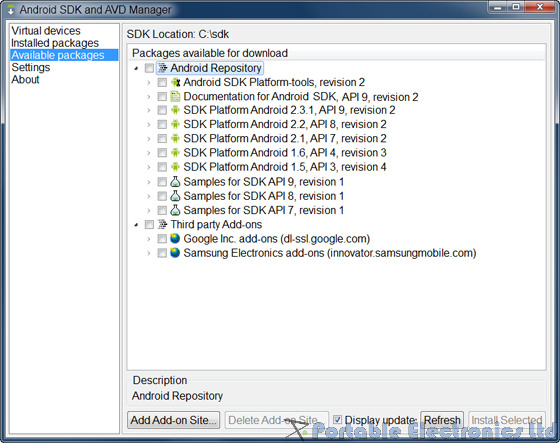
Since you would be connecting your Android device to the computer, you will need to download the USB driver. Expand the option for "Third party add-ons" and then the "Google inc add-ons", tick the checkerbox for the "Google USB driver package" and then click the "Install Selected" button below.
As explained in the Official Android developer installation guide. The Android Repository offers these types of components:
- SDK Tools (pre-installed in the Android SDK starter package) — Contains tools for debugging and testing your application and other utility tools. You can access these in the
<sdk>/tools/directory of your SDK and read more about them in the Tools section of the developer guide. - SDK Platform-tools — Contains tools that are required to develop and debug your application, but which are developed alongside the Android platform in order to support the latest features. These tools are typically updated only when a new platform becomes available. You can access these in the
<sdk>/platform-tools/directory. Read more about them in the Tools section of the developer guide. - Android platforms — An SDK platform is available for every production Android platform deployable to Android-powered devices. Each platform component includes a fully compliant Android library and system image, sample code, emulator skins, and any version specific tools. For detailed information about each platform, see the overview documents available under the section "Downloadable SDK Components," at left.
- USB Driver for Windows (Windows only) — Contains driver files that you can install on your Windows computer, so that you can run and debug your applications on an actual device. You do not need the USB driver unless you plan to debug your application on an actual Android-powered device. If you develop on Mac OS X or Linux, you do not need a special driver to debug your application on an Android-powered device. (See Developing on a Device for more information about developing on a real device.)
- Samples — Contains the sample code and apps available for each Android development platform. If you are just getting started with Android development, make sure to download the samples to your SDK.
- Documentation — Contains a local copy of the latest multiversion documentation for the Android framework API.
The Third party Add-ons provide components that allow you to create a development environment using a specific Android external library (such as the Google Maps library) or a customized (but fully compliant) Android system image. You can add additional Add-on repositories, by clicking Add Add-on Site.
Step 4: Setup the AVD
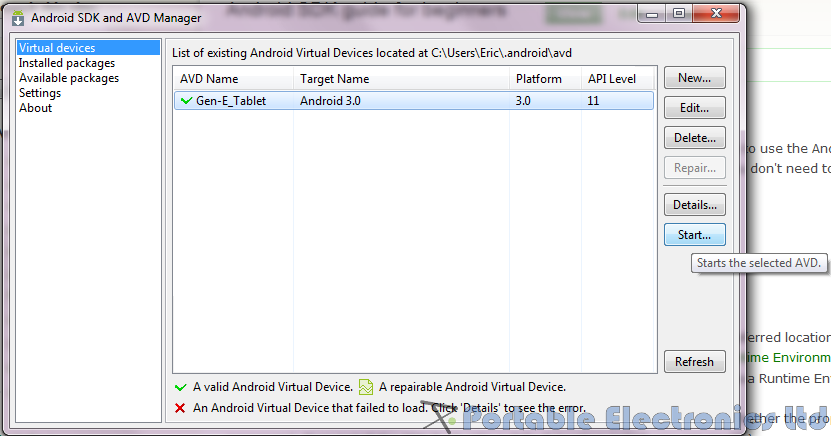
After the SDK platform download you selected is completed, click on the Virtual devices option as shown below.

Click on "new" and you will see the screen below.

Enter the name you want to call this Android Virtual Device (AVD), e.g. Gen-E_tablet; select the target platform, e.g. Android 3.0; enter the size of the virtual SDcard, e.g. 100MB; at the skin section, select from the list of preset resolutions or specify your own and then click "Create AVD".
Note: it is reported by some people that the Android 2.3 and Android 3.0 emulator runs very slowly, i.e. would require computer with high performance CPU to run smoothly.
Step 5: Run the emulator
After clicking OK from the prompt, select the AVD you want to use and then click "Start" to run the emulator. Then, you can tick the option "Scale to real size" if you want to see the emulator run in full resolution as you have configured earlier. If you tick the option "Wipe user data", all your previous applications, settings, etc will be deleted and reset to default.
Wait for the loading to finish and start have fun with the emulator. Note: it can take 5 mins or more for the emulator to start up.
Step 6: Capture screenshot from the emulator or actual Android device
Once Android emulator is running, you can also capture screen using the Dalvik Debug Monitor Service (ddms) tool. To run DDMS, double click on ddms.bat located within the tools folder, i.e. android-sdk-<machine-platform>\tools\ddms.bat
To capture the screen, select Device -> Screen Capture
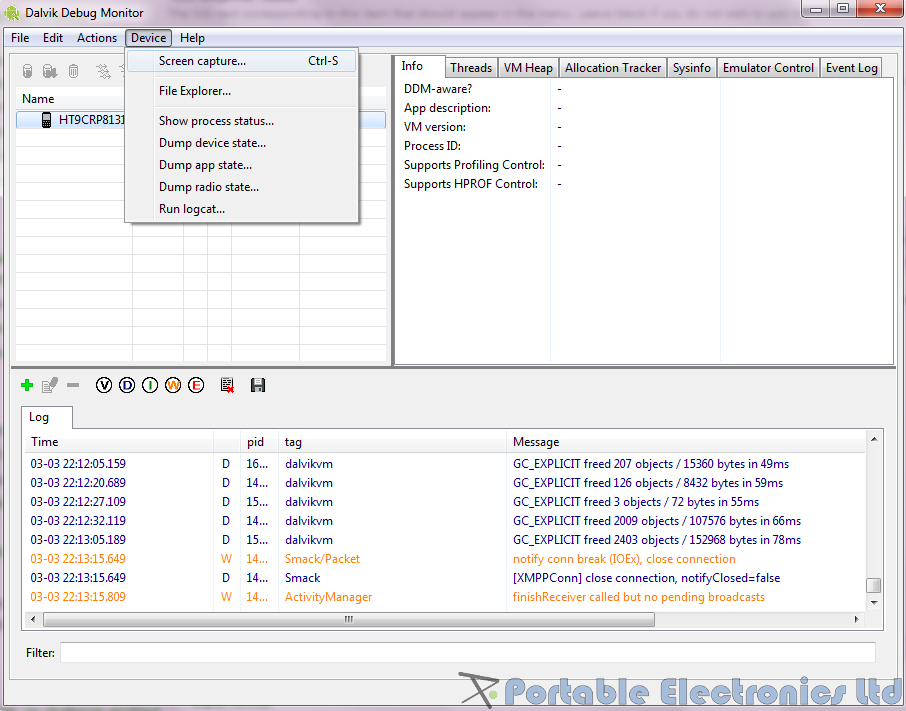
A pop-up window will show up with a few options. To update the screen to match the emulator or device's, click "Refresh". To save the captured screen, click "Save".
You can also capture the screen of an actual Android device using DDMS.
First, using your Android device, go to Settings -> Applications -> Development -> Enable USB debugging
Second, connect your Android hardware to the computer using the USB cable and install the USB driver.
If you are using Windows 7
To install the Android USB driver on Windows 7 for the first time:
- Connect your Android-powered device to your computer's USB port.
- Right-click on Computer from your desktop or Windows Explorer, and select Manage.
- Select Devices in the left pane.
- Locate and expand Other device in the right pane.
- Right-click the device name (such as Nexus S) and select Update Driver Software. This will launch the Hardware Update Wizard.
- Select Browse my computer for driver software and click Next.
- Click Browse and locate the USB driver folder. (The Google USB Driver is located in
<sdk>\google-usb_driver\.) - Click Next to install the driver.
See the Official Android developer's USB driver installation guide for details on installing the USB driver on Windows XP and Windows Vista.
Capture device log
In order for the application developer to fix problems with the application, e.g. forced close issues. It is often necessary to provide them with a detailed description of your action which the developer can be replicate and application/error log.
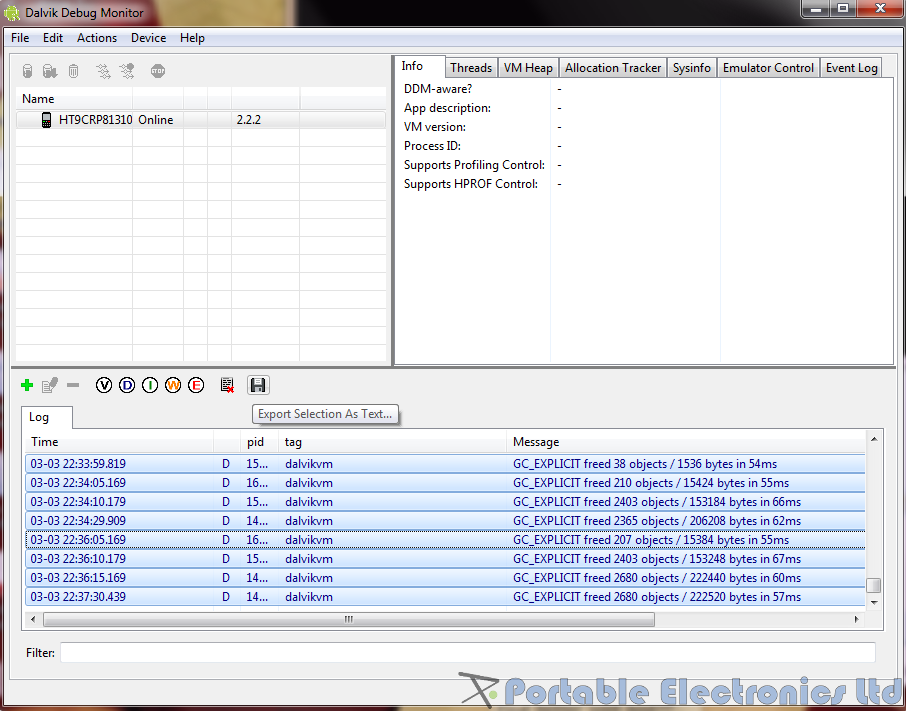
Using DDMS, one will be able to see the errors in the log as well as export, i.e. save it, so that it can be sent to the developer for further analysis.
With DDMS running and your device/emulator connected, select one of the row in the log field, click "Edit -> Select All" at the menu, then click on the save icon and it will trigger a prompt to ask you where to save the log.
Copy file to and from the emulator/device
DDMS can also be used to browse, copy files to and from the emulator/device. With the device connected and DDMS opened, click "Device" -> "File Explorer..." to enter the file browsing interface. One of the button at the top allow one to pull (copy) files from the emulator/device while the other allow one to push (copy) files from the emulator/device.

SDK Command Prompt
To access some advanced functions in the SDK, one need to use the command prompt interface. To access command prompt in Windows 7, click Start -> All Programs -> Accessories -> Command Prompt
When the command prompt interface is opened, one needs to navigate to the tools folder inside the SDK folder before commands can be issued. In the example screenshot below, the SDK folder is saved under c drive.
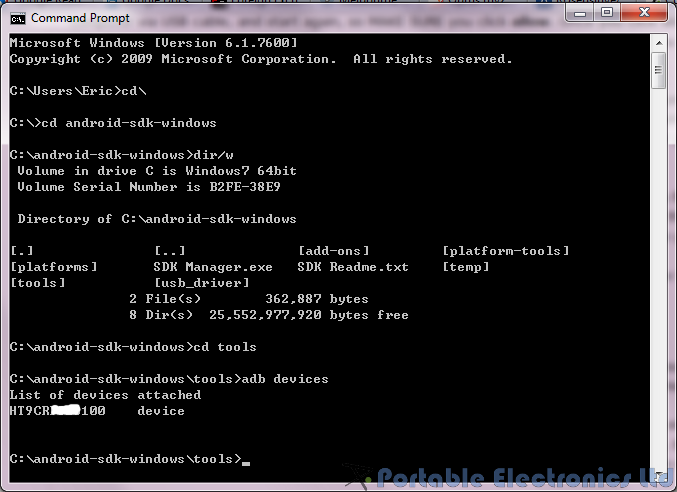
- To check if the device/emulator is connected to the computer, as shown in the screenshot above use the command >adb devices
- To Install an applications to the emulator/device. First, copy the apk file into the SDK\tools folder. Second, with the device/emulator running and connected to the computer, use the command >adb install your_application.apk
- To uninstall an applications to the emulator/device, with the device/emulator running and connected to the computer, use the command >adb shell rm your_application.apk
Click here for related information.
Tips/Tricks
1) The emulator does not come with the Android market, Google voice search and other Google proprietary application, how can you have them on the emulator?
a) Go to the HTC website and download the ADP system image
b) Extract the files and replace the emulator AVD's with the system.img from the ADP system image
c) Start the emulator normally. Now you are running the ADP system image on emulator with all the proprietary applications that are not included in the Android SDK, such as Android Market, Google Voice Search, etc......
For more info, see Kumar Bibek's blog
2) How do you rotate the emulator screen?
a) Switch to previous layout orientation (for example, portrait, landscape) -> KEYPAD_7, F11
b) Switch to next layout orientation (for example, portrait, landscape) -> KEYPAD_9, F12
3) How to see Phone information, Battery information, Usage Statistics and Wifi information?
In the phone dialer, enter *#*#4636#*#*